
Fall fireplace and Country Living Fair finds

I love to decorate and re-decorate my home! I love to make beautiful spaces for my family to live in. I also have a passion for crafting and creating new things. 
I do this blog in hopes to inspire you to make something beautiful for your Home and Family.

     I feel like an official blogger now that I am sitting down to write my second blog post.  And, I'm so excited about this one...

     I wanted to share with you all my fireplace/hearth/built-ins fall redo.  My family room is always done with blue and green accents so I kept that theme while I sprinkled in my fall decorations.  I really hope you like it and it inspires you to rearrange for the upcoming season change.  Here are the pictures:

I love to decorate and re-decorate my home! I love to make beautiful spaces for my family to live in. I also have a passion for crafting and creating new things. 
I do this blog in hopes to inspire you to make something beautiful for your Home and Family.

I love to decorate and re-decorate my home! I love to make beautiful spaces for my family to live in. I also have a passion for crafting and creating new things. 
I do this blog in hopes to inspire you to make something beautiful for your Home and Family.

     What do you think?  I love that my built-ins are painted an off-white!  I can put just about any color on the shelves and it will pop.  I have to be a little careful though, they can start to look really cluttered so I repeat "less is more" the entire time I'm placing items. :)  

     Heres how I reorganize my shelves.  I've done this lots of times so I've come up with an easy way to get the look I want.  Trust me it can get very overwhelming! 
     ~First, I empty all of the shelves completely and lay everything out on my couch to make it easy to see what I'm working with.  This is also a great time to dust everything!
     ~Next, I take all of the tall pieces and arrange them around the shelves.  You want to make sure they are evenly placed around but be careful not to create a pattern or be too predictable.
     ~Then, I take all of the medium/small pieces and place around the tall pieces already placed.  This is where you can start to make groupings of items.  You'll want to shift things to make them work and don't worry if you find yourself starting back at the first step, I do it all the time!
     ~Last, I like to stand way back and look to make sure everything looks good from a distance.  This is my favorite step because I usually get a huge grin and instantly fall in love with what I did and then immediately change something.  ;)

     I hope these steps work as well for you as they do for me.  I have built-ins in both my family room (pictured) and my formal living room.  I'm just starting to work in there and I'll be sure to post what that looks like as soon as I'm finished.  Those shelves are stained very dark brown and this method works really well in there too.  

     And now to share with you some of the amazing finds I brought back with me from The Country Living Fair this past weekend in Columbus, Ohio.  As mentioned in my first post, my Mom and I spent the day walking from vendor to vendor in awe of all of the beautiful things they have to sell.

     Here is what I brought back with me:

I love to decorate and re-decorate my home! I love to make beautiful spaces for my family to live in. I also have a passion for crafting and creating new things. 
I do this blog in hopes to inspire you to make something beautiful for your Home and Family.I love to decorate and re-decorate my home! I love to make beautiful spaces for my family to live in. I also have a passion for crafting and creating new things. 
I do this blog in hopes to inspire you to make something beautiful for your Home and Family.
I purchased both of these pictures from the same vendor.  They are both made of very heavy duty pallet wood, painted and distressed.  (using Annie Sloan paint would be perfect to make a similar project)  The top picture was $35 and the bottom picture was $30.

I love to decorate and re-decorate my home! I love to make beautiful spaces for my family to live in. I also have a passion for crafting and creating new things. 
I do this blog in hopes to inspire you to make something beautiful for your Home and Family.

Next up, this little beauty...  I actually saw this piece from a distance and knew I had to have it!  I was so worried someone would get to it before me I almost ran to it!  It matches my blue/green family room PERFECTLY!  It is a half bird cage so it hangs on the wall perfectly!  Especially the beadboard paneling in my kitchen.

I love to decorate and re-decorate my home! I love to make beautiful spaces for my family to live in. I also have a passion for crafting and creating new things. 
I do this blog in hopes to inspire you to make something beautiful for your Home and Family.

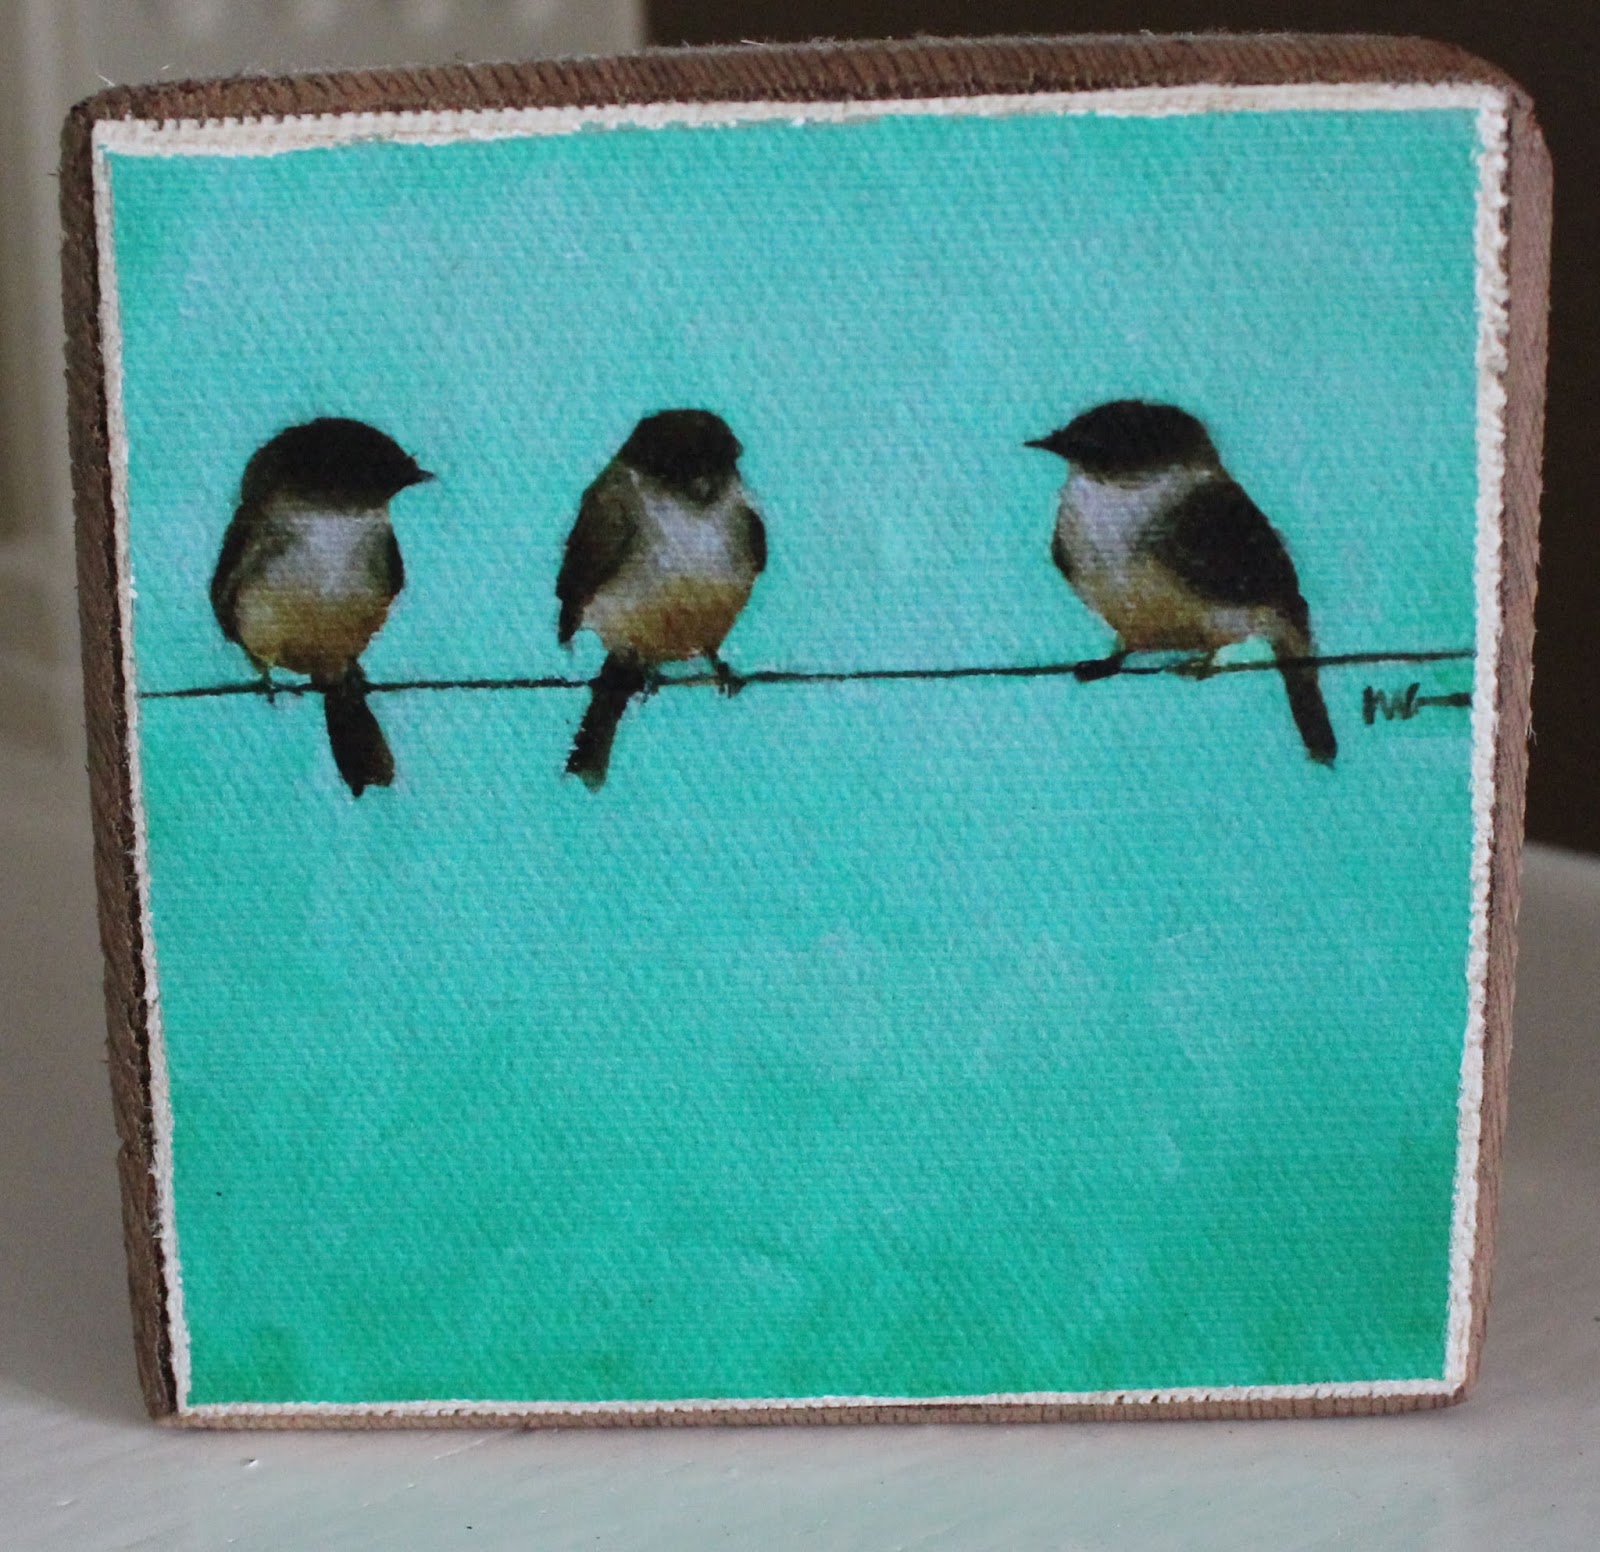
I absolutely love this painting!  It only stands about 3 1/2 x 3 1/2 and is actually a canvas on a block of wood.  I hope to get a larger piece from the artist in the very near future!  The artists' name is Mary Gregory from Mary Gregory Studio, LTD and she is from Abilene, Texas.  You can see her other artwork here:  marygregorystudio.com  Everything on her site is absolutely gorgeous!

I love to decorate and re-decorate my home! I love to make beautiful spaces for my family to live in. I also have a passion for crafting and creating new things. 
I do this blog in hopes to inspire you to make something beautiful for your Home and Family.

And last I got this bundle of fabrics from Olive Grace Studios.  
You can find them here:  olivegracestudios.com
These fabrics look so great together, she is an expert at matching up complimenting fabrics.

Included in the bundle are:
~Moda (april showers, noteworthy, scrumptious, marmalade, and a walk in the woods)
~Windham Fabrics (Briar Rose by Heather Ross)
~Art Gallery Fabrics (Little Town Glee by Bari J.)

My plan is to make a busy book for my little miss E out of all of this fabric.  Stay tuned I will be posting that adventure!

Thanks for stopping by!
I hope you come by often!
~Jamie


Comments

Popular posts from this blog

Why my blog failed, and how I'm fixing it!

Several years ago when I started my blog I had no idea what I was doing or where I wanted it to go!  Now... three years (and two more kids) later I am finally on the right track!  I have discovered that I did this whole blog/business thing backward.  I jumped in on writing a blog without really having much content to write about and frankly I was boring myself with my posts!  I stopped checking in on it because it became a burden, and with no real followers, I felt it drift away. Having a blog has always been a goal of mine and I often let my mind wander and daydream about what my hopes and dreams would be for it yet I have no idea what I'm doing!  But, I knew I needed a better plan than the one I currently had!  So I decided to sit doing are really analyze what my goals are and how to get this up and running without having a repeat experience.   And what I did without even knowing is--- I started things over.  Like from scratch started over!  I sat down and really reflected.

A Start to January's Embroidery Kit

             I'm finally getting started on my monthly embroidery kits and since I'm totally OCD about things I started with January!  I wanted to be farther along on these by now but having three kids, a husband and trying to keep my business things in order hasn't left much time to sit and stitch.  But I wanted to share how the process is going.  Stay tuned for the rest of the months!  I'm so excited to share a few of these months because they are soooooo flippin' CUTE! Ready for stitching! A peek at what the back looks like. A quick bath gets the water-soluble ink off. Backing fabric added and trimmed and snipped in 1/2 in sections. I hot glue the fabric to the inside of the hoop to secure it in place. AND DONE!!  I love the way this snowflake looks against the dark fabric.  You will be able to find these DIY Embroidery kits in my Etsy shop very soon.  Visit www.etsy.com/shop/emmajanesporch

How to make a pillow for less than $3 ~Plus a Giveaway~

I've been working so hard in my sewing room coming up with lots of creative ideas and I'm so excited about this one.  Why?  Because it's super economical and who doesn't love that!   Also, I am holding my first giveaway! Click here to Enter the giveaway for a $20 gift card So, lets get started!  Today I made this adorable green striped pillow for less than $3!  And I'm going to show you how I did it, but first, let me tell you how I made this work. Late last summer I was wandering around Pier 1 Imports (one of my FAVS) and I noticed a few striped napkins in the clearance section.  I thought they were really cute but they didn't match my dining room.  So what happened next, was that struggle we all do in our heads.  You know you don't need it, but something inside tells you "just get it".  Of course that little voice won out, especially when I saw they were only $0.98 each!   Yes 98 cents! So I put 6 in my basket, bro